
Article: Tips for painting your own custom baits, Part 2: Clear-coat options
In my previous article, I covered some things I have learned about selecting lure blanks and how important it is to start with a decent blank. In this article, I will cover the other end of the process, which is determining what type of clear coat to use for your lures and the pros and cons of each option (from my perspective).
If you have ever painted a crankbait, or almost anything for that matter, then you know that it doesn’t look “right” until you have applied some type of clear coating over the top of the paint. Prior to that step, it will have no “depth” to the finish. If you used flat or satin paints, then it will also look dull or chalky without any shine or gloss. When I first started making custom crankbaits for my own use, I would spray them with clear lacquer and call it a day. The lacquer made them look decent, yet still lacked depth, and most importantly, durability. After using them for a trip or two, they looked horrible and were covered in scratches, chips and hook marks, etc.
2-Part Epoxy:
That’s when I decided that I needed something better, yet I wasn’t sure which direction to go. My first thought was 2-part epoxy, however, that only narrowed things slightly. It turns out that there are many different brands and types of 2-part epoxy, and some are better suited to making lures than others. Some are designed to cure very quickly, while others are designed to have longer work times. Some are very clear, while others are cloudy to colored. Some brands start out clear, yet tend to yellow over time, especially when exposed to direct sunlight, which is obviously common with fishing lures. I needed some guidance from others who had been down that road before, therefore, where should I look? As with most topics, the answer was pretty obvious…..”Google it”. However, what I got back was everyone’s opinion and I wanted something a little more “fact-based”.
I found this article extremely helpful: (https://polymerclayjourney.com/2019/01/16/resin-yellowing-test/),
They tested 12 different brands of epoxy over 17 months of direct sun exposure to determine which ones yellowed the most and which ones stayed clear. There are obviously other things to consider other than how clear they are, yet this was a big one for me. Based on the results of this test and my ability to buy it at a reasonable price, I decided to use “Amazingly Clear” by Alumilite.
Measuring, mixing and applying:
Like most other 2-part epoxies on the market, it has one-part resin and one-part hardener, and you mix them in equal amounts. It is very important to get the mixture right or it will either cure too quickly or take forever to harden (if ever). The box of “Amazingly Clear” came with a few small “medicine cups” to use for measuring, along with a larger cup for mixing. It also came with a couple “popsicle sticks” to use for stirring. That said, I found out quickly that I needed more of each, as it is best to throw those away after each time you mix up a batch. I have found that my local “dollar store” is the best place to find those items for very reasonable prices. They also have the inexpensive “craft brushes” that work great for applying the epoxy to my baits. I can get a 6-pack of brushes for $1.25.
When I first started using 2-part epoxy, I noticed that it worked great for about the first 6-7 baits, then it started to get thicker with each lure that I did. By the end of each “session”, it was like trying to work with toothpaste. Some of the baits that I did back then ended up having a very thick coat of epoxy on them, to the point that they actually didn’t run correctly in the water (likely due to the extra weight). After confiding in others who had more experience using it, I learned that I needed to “thin it” before and even during the application process.
There are essentially two paths that you can take to do this:
1) Apply heat to it.
2) Add a solvent to it.
I tried the heat method first (with a heat gun) and it worked, however, I found it to be more of a pain to deal with. It would only thin the epoxy for a very short time and then I had to do it again. It felt like I was spending more time heating it than I was applying it. I know some guys use hot water and they submerge the cup of epoxy partway into the warm water. I tried that as well, but found that wasn't too great either. The cup wasn't stable and the water cooled quickly.
Therefore, I decided to try the solvent route. Based on what I have read, the most effective way to thin epoxy is with acetone. Some people believe that doing so can change the chemical make-up of the epoxy, which may alter its durability. I have yet to see any evidence of that with my baits, so until I do, that is the route that I have chosen to take. After mixing the epoxy, I add a small amount of acetone to the mixture (Note: be careful doing this in some of the cheaper plastic cups, as the acetone will make them disintegrate). This will vary depending on how big your batch of epoxy is. I don’t actually measure it; I just splash a tiny bit in and mix it until it has the consistency of warm maple syrup. As I am applying the epoxy to my baits, I may have to add a tiny bit more acetone if I am doing a large batch. If I notice it getting too thick, I just stop and add a bit more to it and use my brush to mix it.
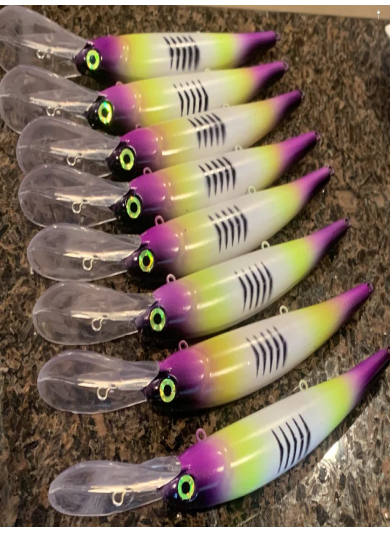
I also want to point out that you can add glitter directly into your epoxy mix, so that it is also applied as you brush on your epoxy. Fine grained glitter works best (IMO) and it does make painted baits look stunningly good. However, I don’t recommend using it on chrome blanks, as it makes them look worse (IMO). Therefore, if I have a batch of baits to clear coat and some of them are chrome, I do those first, before adding the glitter to the epoxy.
You got to know how to hold’em…
One thing you will need to decide is whether you want to also coat the bills on your baits or leave them “as-is”. I think they look better after the clear coat has been applied, not to mention adding strength to them. The only issue with this strategy is figuring out how to hold the baits while applying the clear coat, as the bill is usually the best “handle” for doing that.
I first tried using an “extra-hands lure holder” (the kind with two alligator clips and a base), and it worked ok, however, I ruined it in the process. I tried cleaning it after, but once the epoxy dried, the alligator clips no longer work. They are crusted shut with resin. Unless you want to replace the clips each time, I don’t recommend using that method.
I tried hanging them from a paper-clip that was attached the front eye-let, but it was impossible to control them during the application process, so I ditched that method too. I thought about doing the bodies first (holding them by the bills) and then doing the bills after the body dried. That would work, but it would add another step and a full day to cure in between, so that wasn’t feasible either (in my case). After racking my brain for a method that would work, yet would still allow me to work efficiently, I thought of a tool that is not traditionally used for this type of work….the trusty “vice-grip” pliers. A vice-grip allows me to clamp onto the rear eyelet of the bait, giving me full access to all sides, whilst maintaining control of the bait without the risk of dropping it. It also allows me to hold the bait without having to constantly squeeze hard, which leads to fatigue in my hands and wrists. That said, the one pair of vice-grips that I owned was large, bulky, and heavy, so I decided to purchase a smaller pair specifically for this purpose.
Before I begin coating the baits, I make sure that I have enough paper clips ready to go, as I use those to hang the baits while they dry. I open them up part-way by unfolding them so that they have a half loop at each end, with a straight section in the middle. I bought a 500 count of the smaller ones, so I always have plenty when I need them. I clamp the bait into the pliers by the rear eyelet and hold the pliers in my right hand, while “painting” the bait with my left hand. Once the bait is fully coated, I put down my brush and grab a paper clip from my bench and put it through the front eyelet. I pinch it down slightly so that the bait can’t fall off easily. I hold the paper clip with my left hand and carefully unlock the pliers, releasing the bait. I make sure that I hold it in a way so that it won’t swing and bump into anything when I release it. I highly recommend getting a pair of “vice-grips” with the handy “unlock lever”, as that makes it much easier to remove the bait from them with one hand.

I bought the Kobalt 3-pack from Lowes, but the smallest one (far left) works the best for this.
I make sure that I clean the pliers with acetone after each session. Secondly, I always store them with the jaws open on a piece of parchment paper. Otherwise, they will end up sticking together or to anything they are touching after the epoxy dries.
Epoxy dries to the touch in about 12 hours and reaches full cure in 24-36 hours or so under “normal” temps and humidity.
Alternatives to 2-part epoxies?
The other category of clear coats available are single-stage (1 part) options. These clear coats do not require mixing and they dry on their own when exposed to the air. There are pros and cons to this, but I will get to that in a moment. There is a 3rd type that requires UV lights to cure, but I have never tried them, thus won't be covering those in this article. I won't pretend to have experience in something that I have not actually used.
The most well-known product in this category is called “KBS Diamond Finish Clear Coat”. Eastwood makes a product that is supposedly also good, but I have not tried it, so I won’t comment on it further.
I have a fair amount of experience using KBS, and I believe that it is superior to 2-part epoxy in several areas.
Here are the “pros” of using KBS from my perspective:
- The biggest advantage to KBS is that I am able to dip the entire bait (bill included) into the KBS vs having to brush it on. With a 2-part material, I would have to mix up a huge batch for this to work, and then throw the rest away when I am done. That wouldn’t be feasible, so dipping them in epoxy is not an option.
- The result after dipping them in KBS is a super smooth finish, with no brush marks and an evenly coated bait.
- Dipping them is also much faster than brushing on the epoxy.
- Since I don’t have to mix up a batch of epoxy, I only use what I need at each session. I can do 3-4 baits and put it away. With epoxy, I tend to wait until I have at least 25-30 baits to do before I mix up a batch.
- There are videos on YouTube showing just how durable KBS is after it has fully cured. That said, if you use your baits before they are fully cured, they are likely to chip and scratch. I don’t know which is more durable after they are fully cured (KBS or Epoxy), but I haven’t noticed any significant difference either way. My “gut feel” is that KBS remains more flexible (making it less prone to chips), yet epoxy is “harder” making it less prone to scratches. They are both really good though.
- For example, I painted up some jigs for my personal use in the Detroit River and dipped them in KBS. I used some of them a couple days later (before they were fully cured) and after a few minutes of jigging in rocky areas, they were coming up chipped. However, my next trip out (after they were fully cured), I tried them again and those jigs still looked brand new after a full day of jigging. Even powder-coated and baked jigs that I have used before couldn't take that kind of abuse and not have any chips. So I am very pleased with how durable that stuff is when it is fully cured.
Here are the “cons” to KBS (or other tips):
- It is very important to apply at least one coat of clear lacquer over your baits and let them dry well before dipping them in KBS. Otherwise, the KBS may cause the paint to run on your baits as they dry. This typically only happens with acrylics, however, I have seen it with oil-based paints as well in some situations.
- The full cure time for KBS is much longer than epoxy. The baits are ok to handle within 24 hours under “normal” temps, however, these times can grow to 72 hours or more when it is cold where you are drying them. Full cure-time for KBS is 7 days (per their website) and it can take much longer than that under colder conditions.
- The “fumes” from KBS are much worse than the smell from epoxy, therefore, I am forced to dip them in my garage, despite the winter temps.
- When you combine points 1 and 2, it creates a significant challenge to using KBS during the cold weather months. To solve this issue, I have to move them to my basement after hanging in the garage for 24-48 hours, so they can finish curing in warmer temps. With this process, it takes about a week from the time I start working on them, to the time I can pack and ship them. I have to factor that into my production process.
- It should also be noted that KBS needs to be stored in a cool, dry area. It is also best to keep the exposure to air at a minimum, since air is what causes it to begin the curing process. I learned that one the hard way, as I stored the first batch in my garage over the summer, and the 3rd time I went to use it I found that the bottom half of the jar was like a large super-ball. I ended up throwing it out, which is painful when the stuff costs $50+ per quart.
- It is critical when dipping your baits, to dip them slowly and remove them even more slowly, or you will have lots of bubbles. You can also get bubbles if the baits are drying in an area that is a bit too warm and/or humid (in my experience). They also say not to stir it too much and not to shake it.
- When I open a can of KBS, I pour some of it in my “dipping jar” (which is a tall, thin glass jar that originally held peppers that I found a Walmart). I pour the rest into my “storage” jar, which is a larger glass jar. I throw away the can. Make sure to leave some room in your dipping jar so that when you submerge a bait all the way that it doesn't overflow the jar. I keep both jars handy so that as the KBS in my dipping jar gets too low to dip them all the way, I just add a bit more from the storage jar.
- I always make sure put some parchment paper or plastic bag between the lid and jar, or I won’t be able to open it the next time.
The crankbaits were hung in the basement with care….
After hanging the freshly coated lures, they will continue to drip for quite a while after (with epoxy or KBS). Therefore, it is very important that you have a way to capture the excess as it drips off. I have found that the lids from large plastic storage bins (that you might find at any big box store) work great for this purpose. I have lots of them around my house from bins that have been destroyed along the way. I put them “top-down”, so there’s a shallow lip that keeps the drippings from running all over the place. As for where to hang them, the choices are endless, really. You just need a place to hook them where they won’t get bumped and something under them to catch the drips. Since I do so many of them at a time, I rigged up a large drying area over my work bench in my basement. However, I have racks and other things rigged up in my garage and other places around my basement.

The photo above shows my "drying area" that I have set up on my workbench in my basement furnace room. I tied two lengths of twine between some shelves that I have down there to hang baits from, with two storage box lids below them to catch the drippings. I can easily hang 50-60 baits in this area at one time. I also have wire shelves on the far end that serve as additional drying space once they have stopped dripping.
Safety Rules….
Please refer to the safety instructions and MSDS safety sheets for each product that you decide to use for details. I am not going to cover safety at that level. However, I will say that I have read and watched videos done by people who claim to have significant health issues related to their use of epoxy without proper safety gear. Do your research and take proper precautions. Wear gloves; wear a respirator when painting and/or using resins/KBS, etc. This stuff is no joke and can be harmful if not handled properly.
Note: I am not affiliated with, nor compensated in any way by any of the companies (or their respective brands/products) mentioned in this article. The statements made in this article are mostly my opinion (unless otherwise noted), therefore, please take them for what they are worth and consider all sources of information. I am just trying to pass on what I have learned and hopefully others can benefit from my experience.
Cheers,
Mike Schlimgen (aka Slimshady)
See you all on the water!